
How to Sand Inside Tight Corners on Wood Projects
Woodworking is a deeply satisfying craft, but even seasoned builders hit a frustrating wall when it comes to finishing. According to industry surveys, over 68% of DIY woodworkers say that sanding tight corners is the most challenging part of any wood project. Learning how to sand inside tight corners on wood projects is a skill that separates average finishes from truly professional results. The right tools, techniques, and a little patience can transform those tricky recesses into smooth, paint-ready surfaces. This guide covers everything you need to get it done right the first time.
Why Sanding Tight Corners Is Harder Than It Looks
Flat surfaces respond easily to orbital sanders and sanding blocks. Corners, coves, and inside angles, however, demand a completely different approach. Most standard sanding tools simply cannot reach into tight recesses without leaving unsanded ridges. Additionally, pressing too hard with a flat tool can round over crisp edges, ruining the clean lines of a well-built piece. Understanding the challenge is the first step toward solving it effectively.
The Problem With Generic Sanding Tools
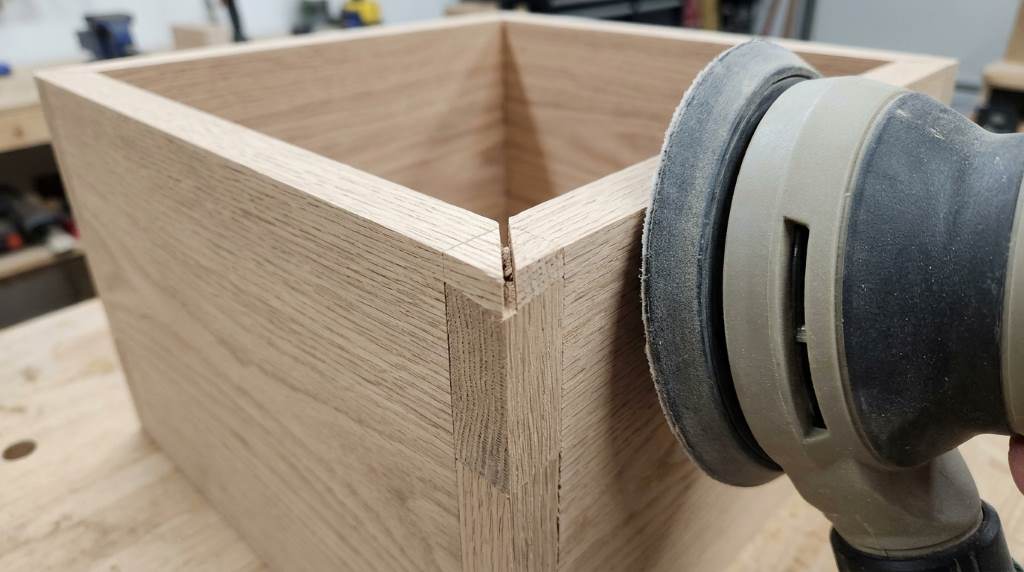
Standard sanding blocks were designed for flat or gently curved surfaces. They flex slightly but not nearly enough to conform to a sharp interior corner. Using a large orbital sander near a tight corner often leaves a halo of unsanded wood along the junction. Many woodworkers end up reaching for sandpaper folded awkwardly in their fingers, which leads to uneven pressure and inconsistent results. Knowing which tools are built for corners changes everything about how efficiently you can work.
What Happens When You Skip Corners
Skipping corners during sanding creates visible problems once you apply stain or paint. Finish tends to pool in unsanded crevices, creating dark blotches that draw the eye immediately. Rough fibers in corners also absorb more finish than surrounding wood, causing color inconsistencies across the piece. Furthermore, rough edges can snag fabric, fingers, or items placed near the project. Taking the time to properly sand inside corners protects both the appearance and the function of your finished work.
Essential Tools for Sanding Inside Tight Corners
Having the right toolkit makes the process of learning how to sand inside tight corners on wood projects much faster and far less frustrating. Several specialty tools exist specifically for this purpose, and most are affordable and widely available. Building even a basic corner-sanding kit saves time on every future project. Below are the most effective options available today.
Detail Sanders and Mouse Sanders
Detail sanders, often called mouse sanders due to their pointed nose shape, are purpose-built for tight spaces. Their triangular pad fits neatly into inside corners and removes material quickly and evenly. Most models accept hook-and-loop sanding sheets in grits ranging from 60 to 220, so you can work through the entire grit progression without switching tools. Brands like Bosch, Black+Decker, and Makita offer reliable detail sanders at accessible price points. Running the sander at a moderate speed gives you better control in confined areas.
Sanding Sticks and Files
Sanding sticks are flat wooden or foam dowels wrapped in sandpaper, and they are excellent for reaching into narrow grooves. You can purchase pre-made sanding sticks or create your own by wrapping strips of sandpaper around a craft stick with double-sided tape. Foam sanding sticks conform slightly to the wood surface, making them ideal for coves and curved inside corners. They allow very focused pressure exactly where you need it. Keeping a range of widths on hand covers most situations you will encounter.
Folded Sandpaper Technique
Sometimes the simplest tool is also the most effective. Folding a quarter sheet of sandpaper into thirds creates a firm, crisp edge that fits directly into a corner. The folded edge acts as a sanding chisel, reaching into the very bottom of the joint. Use your fingernail behind the paper to guide it precisely along the corner line. This technique works especially well for fine detail work and final passes before finishing.
Spindle and Drum Sanders
For rounded inside curves, such as those found in chair legs or decorative molding cutouts, a spindle sander is the go-to solution. These tools spin a cylindrical drum wrapped in sandpaper, allowing you to sand curved interior surfaces with consistent pressure. Benchtop oscillating spindle sanders also move the drum up and down while spinning, which prevents heat buildup and extends the life of the abrasive. Smaller drum sander attachments for handheld drills work well for occasional use without a large investment. Always match the drum diameter to the radius of the curve for the best contact.
Step-by-Step Process for How to Sand Inside Tight Corners on Wood Projects
Following a systematic approach ensures you cover every area and achieve a consistent surface. Rushing through any step leaves marks that become visible after finishing. Working methodically through grit progressions is especially important in corners where cross-grain scratches hide easily. The process below applies to most furniture and cabinet projects.
Step 1: Start With the Right Grit
Begin with a coarser grit to remove tool marks, mill marks, or any remaining roughness from cutting. A grit of 80 or 100 is appropriate for raw lumber with visible saw marks. Move to 120 grit next to smooth out what the coarser paper left behind. Always sand in the direction of the grain whenever the geometry of the corner allows it. Avoid the temptation to skip grits, as each step removes the scratches left by the previous one.
Step 2: Work the Corner With a Dedicated Tool
Switch to your detail sander, sanding stick, or folded sandpaper to address the corner itself. Apply light, consistent pressure and let the abrasive do the work rather than forcing the tool. Move in short, controlled strokes that follow the grain direction of the corner faces. Inspect your progress frequently by angling the workpiece under a raking light source. Shadows will reveal any remaining ridges or rough patches that need more attention.
Step 3: Progress Through Grits
After finishing at 100 or 120 grit, move up to 150 and then 180 or 220 grit. Each successive grit removes the scratch pattern from the previous one and leaves a progressively finer surface. Use the same dedicated corner tool at each grit level to maintain consistency. Wipe the surface with a tack cloth or a lightly dampened rag between grits to remove dust. Dust particles trapped under your sandpaper create deep scratches that show up clearly under finish.
Step 4: Raise the Grain Before Final Sanding
After reaching your target grit, lightly dampen the wood surface with a clean, damp rag. This step raises the grain fibers that were compressed during sanding so they stand up and can be removed. Let the wood dry completely, which usually takes 15 to 30 minutes depending on humidity and species. Then make one final light pass with your 220-grit paper or sanding stick. The result is a surface that stays smooth even after water-based finishes are applied.
Step 5: Inspect Under Raking Light
Always conduct a final inspection before applying any finish. Hold a shop light or flashlight low and parallel to the wood surface so light rakes across it at a sharp angle. This technique reveals scratches, ridges, and unsanded patches that are invisible under overhead lighting. Pay special attention to the very bottom of inside corners, as this is where sanding tools tend to skip. Touch up any areas you find before moving on to finishing.
Pro Tips for Better Results in Corners
Experienced woodworkers develop a set of habits that make corner sanding faster and more reliable. These strategies come from trial and error and are worth adopting early in your woodworking journey.
- Use a backing block behind folded sandpaper to prevent your fingertips from rounding the corner edge unintentionally.
- Cut custom sanding profiles from scrap wood to match specific molding or cove shapes, then wrap them in sandpaper for a perfect fit.
- Avoid power tools on the final grit pass in very fine detail areas because hand sanding gives you better feedback and more control.
- Label your sandpaper pieces by grit and keep them organized so you never accidentally re-scratch a surface with a coarser paper.
- Work in good lighting at all times, because corners are deceptively easy to under-sand when you cannot see them clearly.
Common Mistakes to Avoid
Even experienced woodworkers occasionally fall into habits that compromise corner sanding quality. Awareness of these mistakes helps you avoid them before they affect a finished piece.
Rounding Over Sharp Corners
Applying too much pressure with a flexible tool causes the sandpaper to ride up the corner and round it off. Sharp inside corners are a hallmark of quality joinery, and losing that crispness undermines the whole project. Use a rigid folded paper or sanding stick with firm backing to preserve corner geometry. Let the abrasive cut rather than pressing hard. Light pressure with multiple passes always beats heavy pressure with a single pass.
Using the Wrong Grit Too Late
Jumping straight to a fine grit in a corner that still has tool marks or deep scratches traps those scratches under subsequent finish coats. Fine grits cut slowly and cannot effectively erase coarse scratches within a reasonable amount of work. Always begin with the grit that matches the condition of the wood surface. If you are unsure, start one grit coarser than you think you need. It is always faster to skip up a grit than to go back and re-sand.
Neglecting Dust Removal Between Grits
Sawdust and abrasive particles from coarser sandpaper contaminate the next sanding step if not removed. These particles embed in the finer sandpaper and create deep, random scratches that are especially visible on stained surfaces. Use a vacuum with a brush attachment, a tack cloth, or compressed air between every grit change. This step adds only a minute or two but makes a significant difference in final surface quality. Making it a consistent habit protects every project you finish.
Conclusion
Mastering how to sand inside tight corners on wood projects takes practice, but the right tools and a systematic approach make it completely achievable for any skill level. Detail sanders, sanding sticks, folded paper techniques, and spindle sanders each serve specific corner geometries effectively. Working through grit progressions carefully, raising the grain, and inspecting under raking light ensures a smooth, finish-ready surface every time. Take the time to sand corners properly, and your completed projects will stand out with professional-level polish. Ready to upgrade your woodworking results? Start by adding a detail sander and a set of sanding sticks to your shop today.
Frequently Asked Questions
What is the best tool for sanding inside tight corners on wood?
A detail sander with a triangular pad is the most effective power tool, while folded sandpaper or a sanding stick works best for precise hand sanding.
Can I use an orbital sander in corners?
No, a standard orbital sander cannot reach inside corners effectively and will leave unsanded ridges along the junction of the two surfaces.
What grit sandpaper should I start with in tight corners?
Start with 80 or 100 grit to remove tool marks, then progress through 120, 150, and finish at 180 or 220 grit for a smooth surface.
How do I avoid rounding over sharp inside corners while sanding?
Use light pressure with a rigid folded paper or backed sanding stick, and let the abrasive do the cutting rather than applying heavy force.
Why does stain look darker in my unsanded corners?
Rough wood fibers in unsanded corners absorb more stain than surrounding smooth wood, creating visible dark blotches that highlight incomplete sanding.