How to Prevent Wood Splitting When Screwing
Wood splitting during screwing is one of the most frustrating problems woodworkers and DIY enthusiasts face. Studies show that nearly 60% of beginner woodworkers damage their workpieces due to improper screwing techniques. According to hardware experts, wood splitting causes thousands of dollars in wasted materials every year across American homes and job sites. Learning how to prevent wood splitting when screwing saves you time, money, and serious headaches. This guide covers every proven method, tool tip, and technique you need to get clean, professional results every time.
Why Does Wood Split When You Drive Screws?
Wood splits because screws force fibers apart as they enter the material. The grain structure of wood makes it especially vulnerable near edges and ends. Hardwoods like oak and maple resist splitting differently than softwoods like pine and cedar. Understanding the root cause helps you choose the right prevention method from the start.
The Role of Wood Grain
Wood grain direction plays a major role in how and where splitting occurs. Screwing against the grain creates far more stress than screwing with it. End grain is the most vulnerable area because the fibers run parallel to the screw path. Always identify grain direction before driving any fastener.
Common Mistakes That Cause Splitting
Many people drive screws too close to the wood’s edge without any preparation. Using the wrong screw type or size for the wood species causes unnecessary stress. Skipping pilot holes is the single most common mistake beginners make. Additionally, overtightening screws crushes fibers and creates cracks that spread outward.
Pre-Drilling: The Most Effective Way to Prevent Wood Splitting When Screwing
Pre-drilling a pilot hole is the gold standard method for preventing wood splits. A pilot hole removes material so the screw has a clear path without forcing fibers apart. This technique works on virtually every wood type, from delicate balsa to dense hardwoods. Most professional carpenters pre-drill as a standard step on every project.
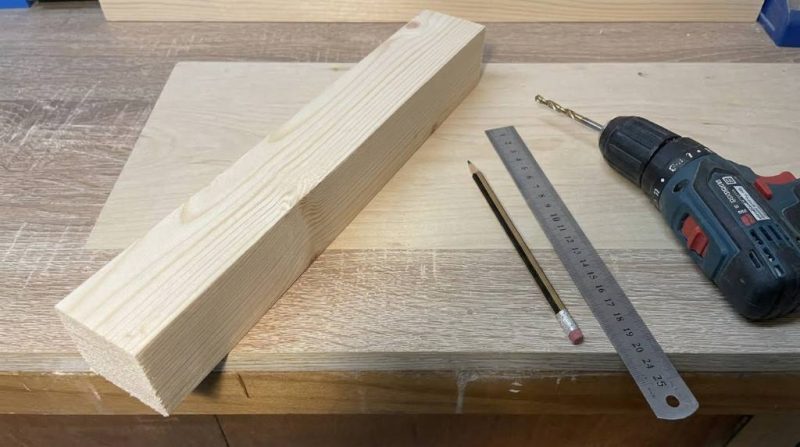
How to Choose the Right Drill Bit Size
The pilot hole should match the screw’s core diameter, not its outer thread diameter. A bit that is too small still causes splitting, while one that is too large reduces holding strength. Use a drill bit sizing chart or hold the bit in front of the screw to compare visually. For most standard wood screws, a bit that is 75% to 85% of the screw’s shank diameter works perfectly.
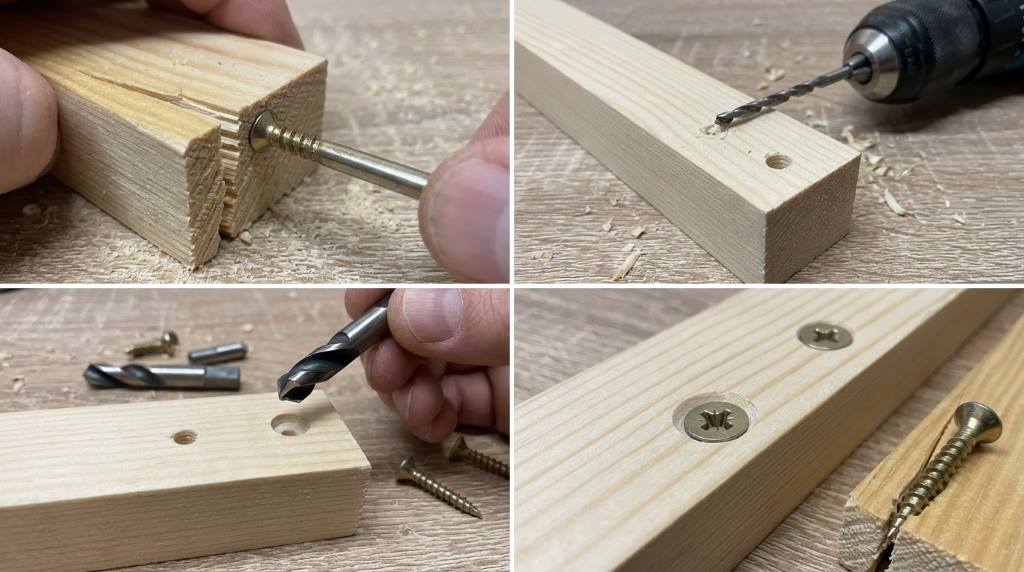
Countersinking for a Flush Finish
Countersinking creates a tapered recess so the screw head sits flush with or below the wood surface. This step prevents the head from splitting the top layer of wood as it seats. Combination drill-countersink bits let you drill the pilot hole and countersink in one step. This small investment saves significant time on larger projects.
Choosing the Right Screws to Prevent Splitting
Not all screws are created equal, and choosing the right one matters enormously. Self-tapping screws with a sharp point and aggressive thread reduce the force needed to enter wood. Fine-thread screws work better in hardwoods, while coarse-thread screws suit softwoods more effectively. Always match the screw type to your specific material for the best results.
Self-Drilling and Self-Countersinking Screw Options
Several modern screw designs include built-in features that reduce splitting risk. Type 17 point screws feature a cutting tip that removes material rather than pushing it aside. Serrated thread screws reduce friction and minimize radial pressure on wood fibers. These specialty screws cost slightly more but dramatically reduce splitting on problematic wood.
Screw Length and Diameter Recommendations
Using a screw that is too long or too wide for the wood is a common splitting trigger. As a general rule, the screw should penetrate the second piece of wood by at least half its thickness. Diameter should never exceed one-tenth of the board’s width near edges. Following these guidelines prevents the screw from getting too close to vulnerable zones.
Smart Placement Strategies to Stop Wood Splitting
Where you place your screws matters just as much as how you drive them. Positioning screws too close to edges and ends puts maximum stress on the weakest points. A safe edge distance is at least twice the screw diameter away from any edge. Spacing screws evenly also distributes load and reduces concentrated stress points.
Staggering Screws Along the Grain
Placing screws in a straight line along the grain creates a weak plane that splits easily. Staggering screws slightly side to side distributes force more evenly across fibers. This technique is especially important when face-screwing long boards together. Even a few millimeters of offset can make a significant difference.
Avoiding End Grain Whenever Possible
End grain offers poor holding strength and splits far more easily than face or edge grain. When you must screw into end grain, always pre-drill and consider using longer screws for extra grip. Wood glue combined with screws into end grain creates a much stronger and more reliable joint. Whenever possible, redesign your joint to avoid end grain fastening entirely.
Using Wax, Soap, and Lubrication to Prevent Splitting
Lubricating screws before driving them reduces friction and heat that contribute to splitting. Simply rubbing a screw across a bar of beeswax or even a candle works remarkably well. Dish soap is another quick and effective lubricant for occasional use. Lubricated screws drive smoother, seat more accurately, and cause significantly less fiber damage.
Clamping and Supporting Wood During Screwing
Unsupported wood flexes under screw pressure, which increases the risk of splitting along weak points. Always clamp your workpiece firmly to a bench or stable surface before driving screws. Using a backer board underneath thin wood distributes pressure and prevents blowout on the exit side. Proper support is a simple but often overlooked step in preventing wood damage.
Moisture Content and Wood Species Considerations
Dry wood splits more easily than wood with slightly higher moisture content. Kiln-dried lumber, common in most American hardware stores, can be particularly brittle near the ends. Allowing wood to acclimate to your workspace humidity for 24 to 48 hours reduces splitting risk. Knowing your wood species also helps, since dense hardwoods always require pilot holes without exception.
Advanced Techniques for Difficult Wood Projects
Using Masking Tape on Split-Prone Areas
Placing masking tape over the drilling area before screwing compresses surface fibers and reduces tear-out. This technique works especially well on thin plywood and veneered surfaces. After driving the screw, peel the tape away cleanly for a professional result. Many finish carpenters use this trick to protect delicate wood faces during assembly.
Applying Wood Glue to Reinforce Joints
Combining screws with wood glue reduces the mechanical load each fastener must carry. Less load per screw means less expansion force inside the wood and fewer splits. Apply glue to the joint, clamp it, and let it set before driving any screws for best results. This approach is particularly effective on frame joints and box construction.
Conclusion: Start Protecting Your Wood Today
Now you have a complete, practical toolkit for how to prevent wood splitting when screwing on any project. From pre-drilling pilot holes to choosing the right screws and lubricating fasteners, each step adds a layer of protection. Combining several of these techniques produces the most reliable and professional results. Start applying these methods on your next project and watch your woodworking quality improve immediately. Share this guide with a fellow woodworker and help them avoid the costly frustration of split lumber.
Frequently Asked Questions
Do I always need a pilot hole to prevent splitting?
Not always, but pre-drilling is strongly recommended near edges, in hardwoods, and whenever working with dry or brittle lumber.
What is the best screw type to avoid splitting wood?
Self-drilling screws with a Type 17 cutting point are among the best options for reducing splitting in most wood types.
Can I use vegetable oil to lubricate screws?
Yes, vegetable oil works as a temporary lubricant, though beeswax or paste wax provides longer-lasting and more consistent results.
How close to the edge can I place a screw safely?
Keep screws at least twice the screw’s diameter away from any edge to minimize splitting risk on most wood species.
Does wood species affect how easily it splits when screwing?
Absolutely, dense hardwoods like oak split more readily than softwoods, so they always require pilot holes and careful screw placement.